


Meta Business Help Centre
How to set up and install a Meta pixel

In this article, we'll cover how to set up a Meta pixel on your website. To learn more about the pixel before getting started, take a look at the benefits of installing a Meta pixel.
There are two steps to set up a pixel:
- Create your pixel and set up the pixel base code on your website. You can use a partner integration if one is available to you or you can manually add code to your website.
- Set up events on your website to measure the actions that you care about, such as making a purchase. You can use a partner integration, the point-and-click event setup tool or you can manually add code to your website.
There are several options for how to set up your pixel and events, and you'll be guided through the available options during setup. If you choose to set up your pixel or events manually, you may need help from a developer to add the code to your website.
If you use your pixel to share events with Meta, we recommend that you also use the Conversions API. The Conversions API works with your Meta pixel to help improve the performance and measurement of your Meta ad campaigns. Learn more about the Conversions API.
Before you begin
- You need a website for your business.
- You or your developer must be able to update your website's code if you plan to set up the pixel manually using code.
Set up the Meta pixel and events on your website
- Go to Meta Events Manager.
- Click
 Connect data sources and select Web.
 - Click Connect.
- Enter a name for your pixel and click Create pixel. This will create a new ID that you can view in Events Manager. Note: Events from your Meta pixel are shared to a dataset, which groups events from different sources. Your new dataset ID is the same as your new pixel ID. Learn more about datasets.
- Your next steps depend on if you have a website or not.
- If you have a website, enter your website URL to check for easy partner integration setup options and click Check.
- If a partner integration is available to you, you'll see it on the screen. Click Next and follow the onscreen instructions to set up your pixel and events through your partner's website.
- If a partner integration is not available, click Next.
- If you don't have a website, click to tick the box next to I don't have a website and click Continue.
- Select how you would like to connect your data with Meta: Get guidance (recommended) or Do it yourself.
- Select Get guidance if you would like setup recommendations. You can skip the rest of the instructions in this article if you select this option, and you can follow the onscreen instructions in Events Manager instead.
- Select Do it yourself if you already know how you'd like to connect your data and don't want setup recommendations. If you select this option, follow the rest of the instructions in this article.
- Select Conversions API and Meta pixel or Meta pixel only as your setup option, then click Next.
- If you select Conversions API and Meta pixel, choose how you want to set up the Conversions API and pixel: Set up with partner integration, Set up with Conversions API Gateway or Set up manually. If you're not sure which option to choose, you can compare Conversions API setup options by cost and complexity.
- If you select Set up with partner integration, select your partner and follow the onscreen instructions to set up the pixel, Conversions API and events.
- If you select Set up with Conversions API Gateway, follow the onscreen instructions to set up the pixel, Conversions API Gateway and events.
- If you select Set up manually, follow the onscreen instructions to create personalised instructions to set up the pixel, Conversions API and events. On the last screen, you'll have the option to set up the Conversions API yourself using the personalised instructions or send the instructions to a developer. If you need help creating the instructions, you can learn how to set up the Conversions API using personalised instructions.
- If you select Meta pixel only, choose how you want to set up your pixel code: Install code manually or Check for partner. If you have a developer who will set up your pixel for you, you can click Email instructions instead.
- Go to Events Manager.
- Click the
 Data sources icon on the left-hand side of the Page.
 - Select the pixel that you want to set up.
- Click Continue pixel setup.
- Select Meta pixel and click Connect.
- Select Install code manually.
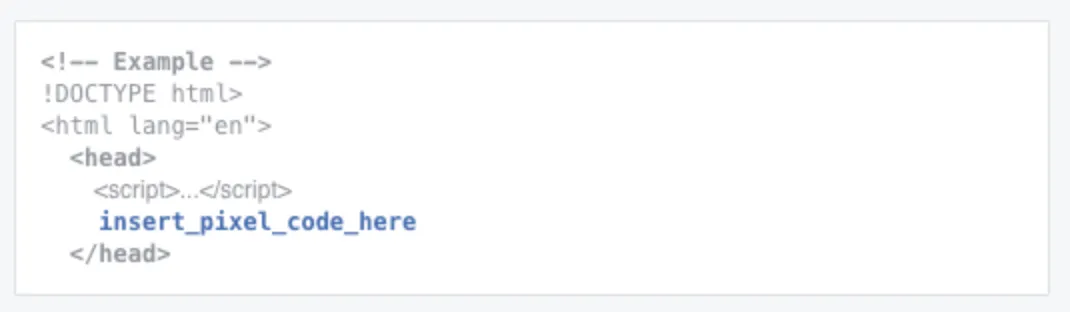
- Copy the pixel base code.
- Find the header of your website, or locate the header template in your CMS or web platform.
- Paste the base code at the bottom of the header section, just above the closing head tag.
- Click Continue.
- Optional: Toggle on Automatic advanced matching and verify the customer information that you want to send.
- Click Continue.
- Add events using the Event setup tool or by manually adding code to your website.
- Click Open Event setup tool to add events and parameters without additional coding.
- Follow the on-screen instructions to add events to your website.
- Click Done.

Install code manually
Check for partner
After you've set up the pixel on your website, learn how to make sure that your pixel is working correctly. Then, learn how to add people to your pixel in Business Manager.


 Log in to Meta for Business